> ## Documentation Index
> Fetch the complete documentation index at: https://docs.moverse.ai/llms.txt
> Use this file to discover all available pages before exploring further.
# UE5 Plugin
> Instruction to properly set your UE5 projects for live streaming through Moverse Capture
## Unreal Engine Plugin Setup
Follow these steps to integrate the Moverse Plugin into Unreal Engine 5 for motion capture streaming and animation retargeting.
### Installing the Moverse Plugin
1. Unzip the .zip file.
2. Close the Unreal Engine Editor if the project is open and running.
3. Locate the extracted folder (`MoversePluginPackaged`) and copy or move it to the `Plugins` folder inside the root directory of your Unreal Project.
4. Open the Unreal project in Unreal Engine.
### Setting Up Live Link for Streaming
1. Navigate to **Window → Virtual Production → Live Link**.
2. Click **Source** and select **Moverse Plugin**.
3. Enter the actor's name, check **Import Assets**, press **OK**, then click **Import All**.
4. Open the Animation Blueprint named `asset_animation`.
5. In the **AnimGraph**, create a **Live Link Pose** node.
6. Connect the **Animation Pose** output of the **Live Link Pose** node to the **Result** input of the **Output Pose** node.
7. [Start streaming from Moverse Studio](../studio/streaming).
8. Select the **Live Link Subject Name** from the **Live Link Pose** node to activate animation streaming.
### Retargeting Animation to a Custom Avatar
1. In the **Content Browser**, right-click your custom avatar's Skeletal Mesh and select **Create → Anim Blueprint**.
2. In the Animation Blueprint graph, add a **Retarget Pose From Mesh** node.
3. Connect the **Animation Pose** output of the **Retarget Pose From Mesh** node to the **Result** input of the **Output Pose** node.
4. Select the **Retarget Pose From Mesh** node and, in the **IKRetargeter Asset** drop-down, choose the appropriate retargeter.
5. **Compile and Save** the Animation Blueprint.
6. Drag and drop the `asset_animation` Animation Blueprint into the viewport to preview it.
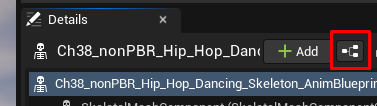
7. To create a Blueprint from this Animation Blueprint, click the highlighted button in the red box.
 ### Configuring the Blueprint for Use
1. Open the newly created Blueprint (BP).
2. In the **Components** panel, select the **Skeletal Mesh Component**.
3. In the **Details** panel:
* Under **Rendering**, set **Visible** to **False**.
* Under **Optimization**, set **Visibility-Based Anim Tick Options** to **Always Tick Pose and Refresh Bones**.
4. Drag and drop your custom avatar's Skeletal Mesh into the **Components** panel.
5. Select the **Skeletal Mesh component**, and in the **Animation** section, assign the Animation Blueprint created for your custom avatar.
6. **Compile and Save**.
Your Blueprint is now ready to be placed and used in your scene.
### Configuring the Blueprint for Use
1. Open the newly created Blueprint (BP).
2. In the **Components** panel, select the **Skeletal Mesh Component**.
3. In the **Details** panel:
* Under **Rendering**, set **Visible** to **False**.
* Under **Optimization**, set **Visibility-Based Anim Tick Options** to **Always Tick Pose and Refresh Bones**.
4. Drag and drop your custom avatar's Skeletal Mesh into the **Components** panel.
5. Select the **Skeletal Mesh component**, and in the **Animation** section, assign the Animation Blueprint created for your custom avatar.
6. **Compile and Save**.
Your Blueprint is now ready to be placed and used in your scene.